Getting started with go-fuzz
In this article we introduce go-fuzz, which is an open source fuzz engine for Go applications. We will first show a brief template overview of a typical Go fuzzer and proceeed to using go-fuzz against a well-known open source project.
This article is a follow-up of a recent video we did on Go fuzzing that you can find here:
In this article we will focus on how to construct a first Go fuzzer for a real-world project. In case you are interested in having a thorough, complete and rigorous course on fuzzing consider our online course here: https://adalogics.com/training-source-fuzz
The prerequisites to follow along with this article is that you have Go installed and have set the GOROOT and GOPATH variables and added the go binary as well as $GOPATH/bin to your PATH variable.
In case you are unfamiliar with fuzzing, from a high level perspective it is a technique for finding bugs and vulnerabilities in a given code base by executing the target application with loads of random inputs. The concept has been around for a while (since 1988 more or less), but it has gained significant popularity in recent years due to its results. For example, the go-fuzz repository maintains a list of some of the bugs found by go-fuzz https://github.com/dvyukov/go-fuzz#trophies which is around 390 by now. Naturally this is only a snippet of the accummualated bugs found by go-fuzz as not all bugs found by go-fuzz are displayed there.
Basic go-fuzz fuzzer
To begin with, let's discuss the steps you take when writing a fuzzer. Consider you have written the following function, and you would like to fuzz it:
This function, TargetFunc, takes a byte array as an input, loops through that byte array and finally returns the input as a string. In the loop, it could check if the input is of a valid format by perfoming some parsing on the bytes.
There may be certain types of inputs that cause our target function to crash, and we want to fuzz this function to find these cases. For that purpose we write a fuzzer by way of go-fuzz and to do this we start with the basic template for a go-fuzz fuzzer:
The data argument is an array of pseudo-random data generated by go-fuzz. This function will be called over and over again by go-fuzz and we can then use the data argument as a resource for triggering execution in the target function, e.g. by passing it into some routine in the target code. Having written our template fuzzer, the next task is to call our target function from our fuzzer and pass the data argument to the target function. In our case, this is what we end up with:
And there you have it! We have written a simple fuzzer, and we could now proceed to compile our fuzzer and run it to fuzz TargetFunc.
You may notice that we assign the return value of TargetFunc to _. The reason for this is that the return value does not serve a purpose in this fuzzer. All we care about is calling the target function from within our fuzzer, and when in this case we can use a blank identifier, since we would otherwise encounter an error when compiling the fuzzer, as Go requires declared regular variables to be used. This is not an approach that will be useful for every fuzzer you write, so the takeaway in this instance is that the return value does not play a role in this particular fuzzer, and that the fuzzer would serve its intended purpose.
With now having briefly covered the go-fuzz template fuzzer and what we need to do with that template fuzzer to write a functional fuzzer, let's move on to fuzz a real-world application.
Fuzzing Vault
We will be fuzzing Vault (https://github.com/hashicorp/vault) - a large open source project with lots of people working on it. Before we get started with fuzzing this project, make sure you have setup the GOPATH variable for your Go development environment.
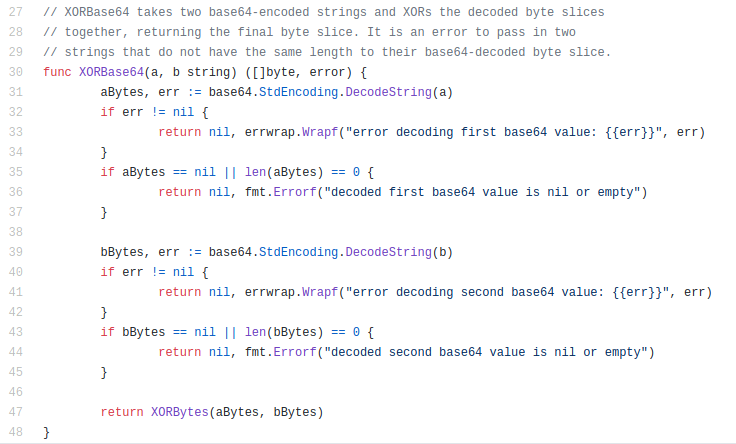
Our target function in the Vault project will be the XORBase64 function in the vault/helper/xor folder, namely this one:
To fuzz this function, we start by installing Vault:
go get github.com/hashicorp/vault
Next we install the packages necessary to both build our fuzzer and run it. For this we need two packages:
go get -u github.com/dvyukov/go-fuzz/go-fuzz github.com/dvyukov/go-fuzz/go-fuzz-build
We then cd into the same directory as our target function:
cd $GOPATH/src/github.com/hashicorp/vault/helper/xor
Next we write our fuzzer. We start by writing the template for our fuzzer, and then we proceed by calling our target function inside our fuzzer template and passing the array of pseudo-random data to the target. We save the result as fuzz.go and we now have the following fuzzer in the same directory as our target function:
Before we compile and run the fuzzer, let's go through it first:
To begin with, we declare the same package as our target function, namely xor. This is the approach we take here, as the fuzzer is placed within the same directory as our target function. It is not a requirement that the fuzzer is implemented in the same package as the target function.
In this fuzzer, the function name Fuzz will be recognized by go-fuzz as an entry point for a fuzzer.
Inside our fuzzer we call our target function. From the introductory example in this article, we recall two things:
- Our job after having written our template fuzzer is to call our target function inside this template fuzzer. We have done that by typecasting our pseudo-random data and pass it as both parameters in the target function.
- We don't necessarily need the return values. In this case that holds true, so we assign the return value to an underscore to avoid getting the error from Go that we have declared a variable that we don't use.
Finally we return 1. For now you don't need to put too much thought into that. We will cover the return statement in a future article on go-fuzz.
With our fuzzer written, left is only to compile it before running it. For this we call the following command from the same directory as our fuzzer:
go-fuzz-build
If you get an error here you have made a mistake somewhere in the process and will need to go back and correct it. If you don't get any errors, you will see that a .zip-file has been created in the same directory:

And with that file created we have succesfully compiled our fuzzer and are ready to run it. To do that we simply run:
go-fuzz
And we now see a screen that looks like this:
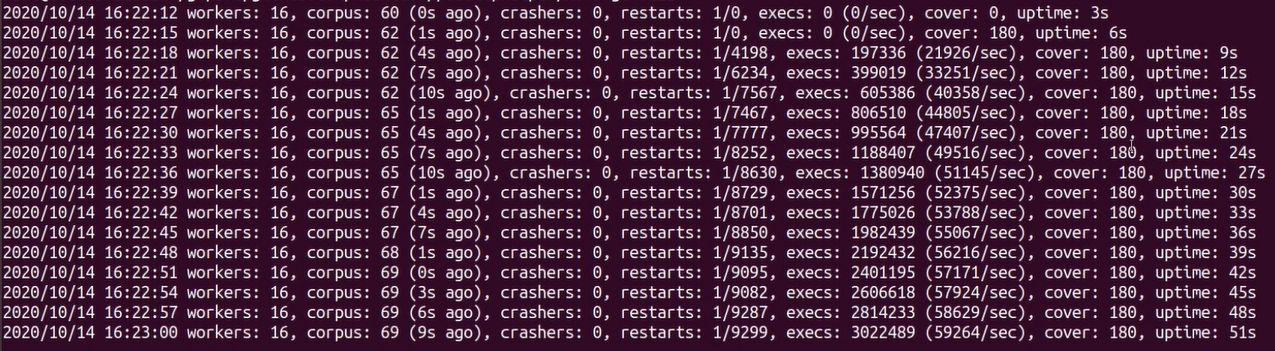
Each line we see here appears every 3 seconds as indicated by the number in the rightmost column, which shows the runtime of the fuzz run. The columns that we pay special attention to are:
- Corpus: This is the number of corpus files that have been created. Each corpus file contains an input that the fuzzer considers useful for the target function. This number should increase within the first few minutes, otherwise the fuzzer might not be effective.
- Crashers: If go-fuzz finds a bug or vulnerability in our target application, this number will increase. The fuzzer will continue to run even when a bug or vulnerability is found.
- Execs: This is the number of total times our fuzzers has executed our target function. In the parenthesis we see the number of executions each second. Unless you are fuzzing heavy applications, as a rule of thumb, this number should be in the thousands.
- Cover: This columns shows the coverage that the fuzzer has explored. This number should increase over time. As we see in our example, this number does not go up, and that is because our target is small and simple. Our fuzzer may have uncovered the entire function within a couple of seconds.
With now having run our fuzzer for a minute or so, we stop it with ctrl + c, and if we check the contents in our folder, we see that three new directories have been created:

The directories, corpus, crashers and suppressions are created when we first run our fuzzer. The corpus directory contains the corpus files. These are files that contain the input, i.e. the bytes from our data array, generated by go-fuzz, where each file triggers an execution path in the target code that none of the other files do. The crashers directory contains information about any crashes our fuzzer may have found. Since we did not encounter a crash in our target in this article, we do not have data in here. In future articles on go-fuzz we will find bugs and vulnerabilities and will explore the crashers directory then. The suppressions directory holds stacktraces of crashes for the fuzzer to ignore in order to avoid reporting the same crash multiple times.
And that brings us to the end. In this article we first covered the basic setup of a go-fuzz fuzzer and how to compile and run it. Next we wrote a fuzzer for a real-world application, compiled it and ran it. Finally we had a glance of the output as well as the files and directories created by go-fuzz.
ADA Logics will release more content on go-fuzz in the future, so stay tuned!